Showing posts with label whole grains. Show all posts

Monday, March 14, 2011

Soaked Raisin Pecan Oat Bread

I made this last month, but am just getting around to posting it. I'm still terribly behind on posting. I'll get there someday, I figure. So anyway, we went to my SIL's house for dinner one night last month. She asked me to bring some kind of bread. I had recently come across a recipe for Cranberry-Pecan Bread on The Nourishing Home and thought I'd make it to take. The original recipe calls for cranberries, but I didn't have any on hand, so I substituted with raisins.  I really liked it with raisins.  Maybe someday I'll try the original recipe with the cranberries, but I rarely buy them, so I'll more likely always use raisins or other dried fruit. This was a very good bread - very moist and flavorful. And I like that it is soaked. I will definitely make this again!  The recipe below makes one loaf.  I doubled it to make a second loaf to have at home since we were taking one to Grand Rapids.

Raisin Pecan Oat Bread

Step One: Soaking
1 cup organic whole spelt flour
1/4 cup Rapadura (or Sucanat)
1/2 cup organic thick-cut rolled oats (not quick-cook)
1/2 cup organic plain whole milk kefir (or cultured buttermilk)
1/4 cup filtered water

Add above ingredients to a large mixing bowl. Add kefir (or cultured buttermilk) and water and thoroughly combine. The mixture will be a very sticky, wet dough.  Cover the bowl and place it in a warm area of your kitchen for 12-24 hours.

Step Two: Baking
2 tablespoons butter, melted
2 tablespoons pure organic maple syrup
1 large egg
1 teaspoon aluminum-free baking powder
1/2 teaspoon baking soda
1/2 teaspoon cinnamon
1/3 cup unsweetened dried cranberries
1/4 cup chopped crispy pecans

After soaking for 12-24 hours, get ready to bake your bread.  Preheat oven to 350 degrees. Add melted butter to the batter and fold into the batter, just until incorporated. Then, add maple syrup, egg, baking powder, baking soda and cinnamon. Thoroughly combine by folding into the batter. Then, fold in the cranberries and pecans.

Place the batter into a well-oiled loaf pan. Bake for approximately 30 minutes, until the bread is a rich brown color and a toothpick inserted in the center comes out clean.


Sunday, February 6, 2011

Honey Whole Wheat Bread

* This is a re-post of a recipe I originally posted in April 2010... I've just updated it to use a healthy oil and updated the instructions to add a little more detail.* 

I have made this bread many times in the last year.  For awhile there, I was making it weekly.  Then I got into sourdough and other breads, so it has been quite a while since I've made this.  I decided to re-visit it this morning and bake a couple loaves.  I switched out the canola oil for a healthy oil (coconut oil), but otherwise this was a great recipe.  It turned out just as delicious with the coconut oil, too.  This is seriously such a soft, yummy bread and is our overall favorite bread. 

I'd like to do some more testing with this recipe since it's our favorite.  I want to try soaking the grains.  I will update and re-post if I'm successful in the coming weeks. 

* Here is the original post.*
I tried out a new bread recipe a couple of weeks ago and made it again this morning. I just haven't gotten around to posting the recipe yet. This comes from Two Peas and Their Pod and it is sooooo good! This is by far our favorite bread so far... and will be our "regular" bread for awhile now. This makes a great sandwich bread. And it is so simple to make. I really liked that it has all whole wheat flour. So many recipes seem to just have partial whole wheat flour in addition to the highly processed all-purpose or bread flour. But not this recipe! Anyway, like I said, this is a delicious bread. This makes 2 loaves, which is nice because you can either freeze the second loaf, or present it as a gift to someone. Perfect!

Honey Whole Wheat Bread

3 cups whole wheat flour
1 T vital wheat gluten
2 packets of yeast (or 4 1/2 teaspoons)
2 1/2 cups warm water

In a large mixing bowl (preferably a KitchenAid), add the 3 cups flour, wheat gluten, and yeast. Stir. Add in warm water and stir until combined. Let sit for 10 minutes.

1/3 cup coconut oil
1/3 cup honey
1 1/2 T lemon juice
1 T sea salt
3 1/2-4 cups whole wheat flour

Mix the oil, honey, lemon juice, and salt in a small bowl. Add to flour mixture after the 10 minutes. Mix until combined. Add in the additional flour and mix.  I usually switch to my dough hook when I'm adding this flour.  Add in the first 3 cups of flour first, continue to mix.  Then, add in about 1/4 cup of flour at a time until the dough is no longer sticking to the bowl.  You don't want the dough to be too wet so that it sticks to the bowl or your hands.  Dough that is too wet makes a dense bread.  You don't want it to be too dry, either... else you'll get dry bread.  If you stop adding flour once the dough is pulling away from the sides of the bowl, you'll end up with a perfect loaf of bread... not dense, not dry, but moist and soft and airy. 

Next, knead the dough for ten minutes with the dough hook. When it is done divide the dough into two loaves. Make sure they are even. Shape them into loaf form. Place the dough into 2 loaf pans that have been sprayed with cooking spray. Cover with a clean towel and let rise for 30 minutes.

Preheat the oven to 350 degrees. After the loaves have risen, bake them for 30 minutes. They should be golden brown. Let cool before slicing, if you can wait. You can freeze one of the loaves if you wish.

This post is re-posted as part of Monday Mania at Healthy Home Economist and Tuesday Twister at GNOWFGLINS.

Monday, January 3, 2011

Whole Wheat Noodles

I have been wanting to try making some homemade pasta for quite some time now.  I have been debating about trying a sourdough recipe, or this whole wheat recipe from Heavenly Homemakers.  My SIL, Mary, made the whole wheat noodles a few weeks ago and loved them.  I decided I was going to give the sourdough noodles a try.  Then my husband asked me what I was doing and I told him I was going to make sourdough pasta.  While he's been a trooper through all of my sourdough trials... and generally likes most of the sourdough things I've made... he asked if I could make something "normal" for once.  So I changed it up and made the soaked whole wheat noodles.  We were all very happy with the result, too! 

These noodles are very easy to make and don't take much time at all.  I really like that they are soaked, therefore increasing the nutrition and digestibility of the grains.  I made some lasagna noodles and made a pan of lasagna for dinner last night.  This was seriously the first time I've ever eaten lasagna where I didn't get an upset stomach afterwards.  It was great!  I'll definitely be making these again and again.  Although, I will be making the sourdough noodles this week so that we can compare. 

Whole Wheat Noodles

2 1/3 cups whole wheat flour
1/2 teaspoon sea salt
2 beaten eggs
1/3 cup water (or an acid medium (buttermilk, kefir, yogurt, whey) for soaking)
1 teaspoon olive oil

To soak grains:

Use the same ingredients, substituting the water with an acid medium like buttermilk, plain yogurt, kefir, or whey. Mix ingredients as described below in a bowl.  I started out with a spoon and then just used my hands.  If your dough is really sticky (mine was), add in a tablespoon or so of flour at a time and mix in.  You don't want the dough to stick to your hands or the bowl... once you get to that point, you'll know the dough is ready.  You also should keep in mind that whole grains will take a bit of time to absorb the liquid/moisture.  If you're not sure about your dough, let it sit for about 15 minutes or so and then go back and check it.  If its still sticky, add a little bit of flour.  If it seems too dry, add a splash of buttermilk/acid medium and knead it in.  Knead for a minute or two, then cover with a towel and let it sit for 12-24 hours. You'll pick back up with the rolling step below.


To make without soaking grains:

First mix the flour and salt together in a bowl and make a little”pit” in the middle. Beat your eggs in a separate bowl, then pour them into the flour mixture. Add the water (or acid medium) and olive oil. Stir well until the ingredients are mostly combined.  Dump the noodle dough out onto a floured surface and knead it a little bit to get the ingredients combined well.

(If soaking grains start here after dough has soaked.)

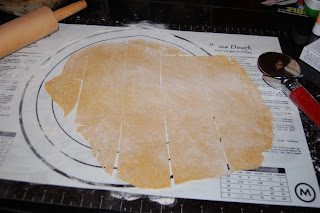
Make sure your surface has a LOT of flour all over it so that your noodles won’t stick when you roll out the dough. Sticky noodles are not fun.

Use a well floured rolling pin and roll and roll and roll until your noodle dough is very thin, about 1/16" in thickness. You may need to keep tossing some flour under the dough as you roll to keep it from sticking.

Use a pizza cutter to cut long strips in the noodle dough. Cut your noodles any length you want... short, fat, skinny, wide, etc. 


Once you’ve cut your noodles you can either use them right away, or you can let them dry so that you can store them and have them ready for when you need them.

You can use a dehydrator to dry the noodles, or you can just leave them on the countertop to dry if you want. It will take a while…like several hours or even an entire day. You may also need to turn the noodles over after a few hours so that the under side can dry.  I used my dehydrator and they were dry within a couple of hours. 


This post is shared as part of Monday Mania at The Healthy Home Economist and the Tuesday Twister at GNOWFGLINS.

Thursday, December 30, 2010

Sausage Cheese Balls

We had to travel two hours west for one of our Christmas parties.  I wanted to find something to take that was portable, tasty, and fairly good for you.  I couldn't decide what to bring, so I scoured the Whole Foods for the Holidays posts.  I came across these Sausage Cheese Balls on Titus2Homemaker.  They sounded very easy and portable.  So I tried them out.  I used our pastured, naturally-seasoned sausage, a mixture of whole wheat and spelt flours, my homemade cultured butter, and raw cheddar cheese.  They are more dough-y than I guess I expected and they didn't blow me away, but they were okay.  They taste like a biscuit with a slight cheese and sausage flavoring.  The naturally flavored sausage doesn't have as much spice as conventional sausage does, so maybe they'd have more flavor with conventional sausage... I didn't think about it in advance, or I'd have probably added a few spices. 

Sausage Cheese Balls

3 cups whole wheat flour (I used 2 cups whole wheat and 1 cup spelt)
1-1/2 Tablespoons aluminum-free baking powder
3/4 teaspoon sea salt
1/4 lb. butter (I used homemade cultured butter)
1 lb. breakfast sausage, raw (I used pastured pork sausage with natural seasonings)
8 oz. grated cheddar (I used raw cheddar, a mixture of mild and sharp)

Combine dry ingredients. Cut in butter. With your hands, mix in sausage and cheddar, adding a tad bit of water to make a dough. Form into 1″ balls (I used my 1-inch cookie scoop) and bake on a baking sheet at 375 for 20 minutes.

Sunday, December 26, 2010

Yummy Yummy Coffee Cake - made healthy(er)

I have been wanting to try making the Yummy Yummy Coffee Cake a little healthier for awhile now.  I figured why not make it for a breakfast during the holidays?  So I made it to have for breakfast on Friday morning.  I used whole wheat and spelt flours and I soaked them in homemade buttermilk.  I also used homemade cultured butter, half sucanat and half cane sugar, farm-fresh pastured eggs, homemade vanilla, sea salt, and aluminum-free baking soda for the cake.  I used sucanat and cane sugar, plus cinnamon for the filling.  And I used unbleached powdered sugar and raw milk for the glaze.  Everything was organic and local where possible.  Its still not a healthy dish, but making it this way is much better for you than making it with processed, conventional ingredients. 

Yummy Yummy Coffee Cake

1 cup whole wheat flour
1 cup spelt flour
1 cup buttermilk
1/2 cup butter
1 cup sugar (I used half sucanat and half cane sugar)
2 eggs
1 teaspoon vanilla
1 teaspoon baking soda
1/2 teaspoon salt

Filling:
1/3 cup sucanat
1/4 cup sugar
1 teaspoon cinnamon
1 cup nuts (optional)

Glaze:
1 cup unbleached powdered sugar
2-3 Tablespoons milk

If you are soaking the flours, mix flours and buttermilk together in a small bowl.  You may need to add an extra 1/4 cup of buttermilk.  You want to have just enough moisture to cover all of the flour.  Cover the bowl with a plate or kitchen towel and let sit at least 8 hours or overnight. 

When you are ready to bake, heat the oven to 325 degrees. Grease a 9x13 pan with coconut oil or butter.

Beat butter, sugar, eggs, and vanilla together. Add baking soda and salt.  Then add the soaked flour mixture.  Stir well. 

Mix filling ingredients in a separate bowl.

Put half of the dough in the prepared pan. Top with half of filling. Spread the remaining dough on top. Then remaining filling.

Bake 35-40 minutes.

While still warm, mix glaze and drizzle over top.


This recipe was shared in the Kitchen Stewardship Soaked Grain Recipe Carnival.

Monday, September 13, 2010

Sourdough - Bucket Method

Last week I tried out some new things we've been learning in the GNOWFGLINS Sourdough E-Course. This was a lesson a few weeks back and I've been anxious to try it. This is based off of the methodology presented in Artisan Bread In Five Minutes A Day (ABin5). I've made several different recipes and types of bread from ABin5 and I love the method. Its so easy. Just mix up the dough one day, stick it in a food-grade bucket or bowl with lid, and pop it in the refrigerator until you're ready to bake some bread. This works great for my busy, working and commuting mom life and I have missed the ease of this method for the last 9 or 10 months. I've wondered about modifying the recipes to make them healthier, but never devoted the time to thinking about it, let alone trying it out.

I was so excited when I read about the lesson a few weeks ago! Wardeh's friend Christina had done the trial and error and had modified the recipe to make sourdough bread with whole grain flours! Yeah! So of course, I had to try it. I mixed up a bucket of dough last week and had intentions of trying a few different ways of baking it... english muffins, cinnamon rolls, and a loaf of bread. I decided part way through the week that I'd actually just make one big batch of rustic english muffins since I didn't have the time for the other two on other nights like I'd hoped. So that's what I did and now I have a good supply of delicious sourdough english muffins in the freezer and for eating fresh. We love them!

Wednesday, August 4, 2010

Zucchini Brownies

I tried out the recipe for zucchini brownies from Heavenly Homemakers the other morning, as well. I made a couple changes... substituted carob powder for the cocoa and added some chocolate chips that I needed to use up in my pantry. These were so easy to throw together, they literally took less than 15 minutes... from the start of getting all the ingredients out, shredding the zucchini, stirring up the brownies, and getting them in the oven. I love quick recipes like this! They also taste really good! We all really liked them a lot. My mother-in-law also got to taste them when I sent one with Carson for a snack and she thought they were awesome (and has asked for the recipe). Definitely a hit! I have the same thoughts I had when making the bread... wishing I had a grain mill so I could use sprouted flour, or wondering if I could modify this to be soaked in the future. Maybe I'll have to do some experimenting.

I'll update soon with a picture.

Zucchini Brownies

1/2 cup butter, melted
1 1/2 cups sucanat or rapadura (I used sucanat)
1/3 cup cocoa (I used carob)
1 cup shredded zucchini
1 egg
2 cups whole wheat flour
(I also added a few handfuls of chocolate chips... milk chocolate and white chocolate... that I had in my pantry)

Mix butter, sucanat and cocoa. Stir in zucchini and egg. Gradually mix in flour until well combined. Pour batter into a 9×13 inch pan. Bake in a 350° oven for 25 minutes or until a toothpick inserted into the middle comes out clean.

Honey Whole Wheat Zucchini Bread

I'm trying to use up some zucchini, as its at its peak production in the garden right now, so I've been looking for new recipes to try. I've been wanting to try the Heavenly Homemakers recipe for honey whole wheat zucchini bread for awhile. So I gave it a go the other morning. This is very good! I love that it uses all whole wheat flour and honey for sweetener, rather than sugar. I'll definitely make this again. I'm really wishing I had a grain mill right now so that I could sprout some wheat and use sprouted flour to make this bread, or soak it or something. I'm really trying to get more into the traditional methods of preparing things, but I just made this recipe as-is. Its still a much healthier version than my normal zucchini bread, so that's an improvement. You can make this recipe into loaves of bread, or into muffins... I've included both below from the Heavenly Homemakders site.

Whole Wheat and Honey Zucchini Bread

3 cups whole wheat flour
2 t. cinnamon
1 t. baking soda
1/2 t. sea salt
1/2 t. nutmeg
1/2 t. baking powder
1 cup honey
2 cups shredded zucchini (I use my food processor to shred zucchini, skin and all)
1/2 cup melted butter
2 eggs

In a large mixing bowl (I used my stand mixer) combine flour, cinnamon, baking soda, sea salt, nutmeg and baking powder. Stir in honey, zucchini, eggs and melted butter. Mix ingredients until dry ingredients are moistened. Pour into two well buttered loaf pans. Bake at 350° for 45-60 minutes or until a toothpick inserted in the middle comes out clean.

Whole Wheat and Honey Zucchini Muffins

Prepare as above, except scoop dough into 24 paper-lined muffin tins. Bake at 400° for 20 minutes.

Friday, May 28, 2010

Quinoa Tabbouleh

I made this quinoa tabbouleh to take on our camping trip this past weekend. We were camping with the Gluten Free Girlie, so I had to make sure all of my food was gluten free. I have been wanting to make quinoa tabbouleh for about a year now, so I figured this would be my chance. I love tabbouleh! And this is a great way to have it if you're gluten free (and even if you're not!). Even Kevin liked this - and he doesn't normally care for tabbouleh. This was very quick and easy to make and is a great summertime healthy salad to take along to your bbq!

Quinoa Tabbouleh

2 cups water
1 cup quinoa
1 pinch salt
1/4 cup olive oil
1/2 teaspoon sea salt
1/4 cup lemon juice
3 tomatoes, diced
1 cucumber, diced
2 bunches green onions, diced
2 carrots, grated
1 cup fresh parsley, chopped
(I added about 2 Tablespoons chopped fresh garlic)

Bring water to a boil. Add quinoa and a pinch of salt. Reduce heat to low, cover and simmer for 15 minutes. Allow to cool to room temperature; fluff with a fork. Meanwhile, in a large bowl, combine olive oil, sea salt, lemon juice, tomatoes, cucumber, green onions, carrots and parsley. Stir in cooled quinoa.

Saturday, May 15, 2010

Strawberry Bread

I made a batch of strawberry bread this morning. The recipe comes from Heavenly Homemakers and my SIL also made a variation of this bread recipe with peaches. This was simple and fairly fast to mix together. I made 3 mini loaves and two small loaves from this. We'll keep one out for breakfasts and snacks this week and I'll freeze the rest. I love having sweet bread in the freezer. It makes for a fast and easy breakfast and its great to have on hand if you head over to a party or something and have no time to make something. We couldn't resist and had to try the bread after just cooling a bit. It is so moist and delicious! Yum!

Strawberry Bread

2 cups fresh (or frozen) strawberries
3 cups whole wheat flour
1 1/2 cups rapadura or sucanat or cane sugar
1 tablespoon ground cinnamon
1 teaspoon salt
1 teaspoon baking soda
1/2 cup melted butter
3 eggs

First, you can do one of two things with your strawberries. If they're fresh, you can slice them and stir them into your dry ingredients. Or, if you don't think your family will like chunks of strawberries in their bread. Blend them all up in the blender, then mix in. If you're using frozen strawberries, thaw, then blend in blender. Mix dry ingredients together. Stir in butter, eggs and strawberries. Pour into two buttered loaf pans. Bake in a 350° oven for 45-50 minutes.

Crunchy Granola Bars

Carson and I were on a granola kick this week, I think. We also made some crunchy granola bars. My SIL had posted this recipe from Ina Garten a couple of months ago and I've wanted to make them ever since. Another quick and easy recipe! And they taste so good, too! I think I like these better than the chewy granola bars, just because they're not so sweet. And I like the crunch. These will definitely be a regular thing for us now, for sure! We'll take some of these camping, too.

Granola Bar

2 cups old-fashioned oatmeal
1 cup sliced almonds
1 cup shredded coconut, loosely packed
1/2 cup toasted wheat germ (I used ground flax so they'd be GF for camping)
3 tablespoons unsalted butter
2/3 cup honey
1/4 cup light brown sugar, lightly packed
1 1/2 teaspoons pure vanilla extract
1/4 teaspoon kosher salt
1/2 cup chopped pitted dates
1/2 cup chopped dried apricots (I used raisins)
1/2 cup dried cranberries (I substituted with chocolate chips :) )

Preheat the oven to 350 degrees F. Butter an 8 by 12-inch baking dish and line it with parchment paper.

Toss the oatmeal, almonds, and coconut together on a sheet pan and bake for 10 to 12 minutes, stirring occasionally, until lightly browned. Transfer the mixture to a large mixing bowl and stir in the wheat germ.

Reduce the oven temperature to 300 degrees F.

Place the butter, honey, brown sugar, vanilla, and salt in a small saucepan and bring to a boil over medium heat. Cook and stir for a minute, then pour over the toasted oatmeal mixture. Add the dates, apricots, and cranberries and stir well.

Pour the mixture into the prepared pan. Wet your fingers and lightly press the mixture evenly into the pan. Bake for 25 to 30 minutes, until light golden brown. Cool for at least 2 to 3 hours before cutting into squares. Serve at room temperature.

Granola

I needed to make a new batch of granola to take some on our camping trip. I had planned to just use my normal granola recipe, but Kevin asked that I try a plain and simple one... without nuts, fruit, etc. So he found a recipe on RecipeZaar that sounded good to him. I figured I'd give it a try since he rarely makes requests and has never went out to find a recipe! So I made it. Very quick and easy to throw together and it does taste good. I just prefer lots of other stuff in my granola. We'll use this granola in yogurt parfaits for camping and Kevin and Carson will eat it. I'll be making another batch of granola with more add-ins for me. :)

Quick and Crunchy Granola

3 1/2 cups oats
1/3 cup butter
1/3 cup honey or maple syrup
1/4 cup brown sugar
1 teaspoon vanilla

Melt butter in microwave. Heat honey in microwave for 45 seconds. Combine all ingredients in a large bowl. Pour onto a baking sheet and spread evenly. Bake at 350 for 20 minutes, stirring after the first 10 minutes. Cool completely. Store in an airtight container for 1 week, or freeze.

Chewy Granola Bars

Carson and I started some food prep for our camping trip that is coming up next weekend. We made some chewy granola bars earlier this week. I had originally seen this recipe on Heavenly Homemakers and then my SIL made them. They sounded too easy and delicious not to make them... plus I've wanted to try making some chewy granola bars for about a year. I can't believe it took me this long to try a recipe for them! They are so easy to make - probably about 8-10 minutes of prep (and that is with a 2-year old helping), then spread in a pan and chill in the fridge. So simple! I'll definitely be making these regularly so I don't have to buy the super pricey ones at the health food store anymore. Carson absolutely loves granola bars (we all do) and these are no exception. He declared them "SO delicious!".

I made a double batch so we'd have plenty to eat for snacks this week and next, take camping, and still have some in the freezer. I also made this batch gluten free. Next time, I'll add some wheat germ or bran. I came so close to adding it to this batch before I remembered these needed to be gluten free for camping. I'll also add another cup of oats next time to make them more like the granola bars we're used to and probably a little less honey since they are so sweet. I calculated the cost of the way I made them this time. They ended up being about 25 cents per 1" x 3" granola bar. This was using all organic/sustainable or homemade (dried cherries/blueberries) ingredients.

Chewy Granola Bars

1/2 cup peanut butter or sunbutter
1/3 cup honey
1/4 cup coconut oil
1 cup oats (I used a little more than 1 cup)
1 cup total of any combination of: sesame seeds, coconut flakes, sunflower seeds, dried fruit, mini chocolate chips (I used sunflower seeds, unsweetened coconut, raisins, dried cherries, dried blueberries, chocolate chips)

In a medium sized saucepan, melt together peanut butter, honey and coconut oil.

Remove from heat and add one cup of oats. Choose your favorite combination of coconut flakes, sesame seeds, sunflower seeds, dried fruit and mini chocolate chips, to equal a total of ONE CUP. (I just got out my one cup measuring cup and poured in the ingredients until the cup was full.) Pour in and stir well.

Spread mixture into a 8×8 or 9×4 pan.

Chill for two hours, then cut into bars.

Wrap in plastic wrap for a quick grab and go snack! Keep in refrigerator or freezer.

Friday, April 16, 2010

Veggie Quinoa Salad with Pesto Dressing

I saw this salad posted on Food in Jars earlier this week and decided to switch up my original meal plans to make it since I already had everything on hand and it just sounded delicious. We had it for dinner last night and it was so, so, so good! A perfect warm weather, meatless dinner! We all loved it! I will definitely be making this a regular meal on our table! It'd be a great salad to take to a potluck, too, since it can be served slightly warm/room temp or chilled.

Vegetable-Stuffed Quinoa Salad with Pesto Dressing

2 cups quinoa (cooked in 4 cups water)
1 bundle asparagus, cut into 1-inch pieces
1 red pepper, chopped (I used a green one since that's what I had)
1/2 red onion, roughly chopped (I added some chopped chives from my garden instead)
1/2 english cucumber, cut into bite-sized pieces
1 bunch flat-leaf parsley, chopped
1 can garbanzo beans, rinsed and drained
6 ounces feta, crumbled
4 ounces of pesto
2 tablespoons apple cider vinegar
olive oil (some for roasting asparagus and some for the dressing)
salt
pepper
Toasted almonds (optional)

Cook the two cups of quinoa by combining it with four cups of water. Bring to a boil and reduce temperature. Simmer for 15-20 minutes, until it is tender. When it is finished cooking, spread it out on a cookie sheet to cool.

Spread the asparagus out on a small cookie sheet. Drizzle with olive oil and sprinkle with salt and pepper. Roast at 425 degrees for 10-15 minutes.

Combine chopped red pepper, onion, cucumber, parsley and drained garbanzo beans in a large bowl.

Whisk the pesto, vinegar and a drizzle of olive oil together until runny. Season with salt and pepper to taste.

Add quinoa to the chopped vegetables. Gently stir to combine. Add the crumbled feta and dressing and fold in. Top with toasted almonds and serve. Can be made up to 24 hours in advance.

Monday, January 25, 2010

Homestyle Whole Wheat Bread

I tried another recipe from The Bread Machine Bible: More Than 100 Recipes for Delicious Home Baking with Your Bread Machine! By Anne Sheasby for our bread this week. This time for homestyle whole wheat bread. This recipe is slightly different from most wheat bread recipes as it doesn't call for dry milk powder. Again, this was a very moist bread with a great crumb and a good, nutty flavor. I have a lot of dry milk powder right now, so I doubt I'll make this one again anytime very soon, but I'll definitely be using this as my recipe once I'm out of the dry milk powder!

As a side note, I am totally loving this weekly homemade bread - never have to buy the stuff from the store again goal! Using the bread machine is super easy - effortless really... so is using the KitchenAid... which I'll be doing more of in the near future. There really is no excuse for not doing this sooner! We don't really eat a lot of bread - and rarely finish an entire loaf in a week... but I've been making homemade bread crumbs and storing them in the freezer with the inch or so of remaining loaf each week. I'm saving tons of money, not having to buy bread anymore, and even more now that I will never have to buy bread crumbs again!! It may not be a huge savings on a weekly basis, but it sure does add up fast! As my bread crumb stock continues to grow, I'll be using more leftovers to make homemade croutons for our salads. If you have any other suggestions, please let me know! I've wondered if I could slice and freeze the ends and pull them out when I get enough to make a french toast bake or strata or something else calling for day-old bread or the like.

I'll update later with a picture... I'm very behind at uploading pics from the camera right now...

Homestyle Whole Wheat Bread

1 1/2 cups water
3 cups whole wheat flour
Heaped 3/4 cup bread flour
1 1/2 teaspoon salt
2 teaspoons sugar
2 Tablespoons butter, diced
1 teaspoon instant dry yeast

Pour the water into the bread pan. Sprinkle each type of flour over in turn, covering the water completely. Place the salt, sugar, and butter in separate corners of the pan. Make a small indent in the middle of the flour and add the yeast.

Close the lid and set machine to Whole Wheat or Multigrain cycle, then select loaf size and crust type. Press start.

Sunday, January 10, 2010

Steakhouse Wheat Bread

I tried another new bread machine recipe for steakhouse wheat bread. I found this one on AllRecipes. This bread is delicious!! It really does taste just like the bread you get in some of the popular chain steakhouses. Whip up a small batch of cinnamon or honey butter and it'd be exactly like eating it at a steakhouse! Mine didn't rise much, but I'm not sure its supposed to since there isn't a lot of flour in it... and it still more than doubled in size, so I think its just how this bread is. It had a great crumb and didn't seem dense or anything like bread does when it doesn't rise enough. So I'm not sure. I'm going to make it again this week, so we'll see how it does then.

Steakhouse Wheat Bread

3/4 cup warm water
1 tablespoon butter, softened
1/4 cup honey
1/2 teaspoon salt
1 teaspoon instant coffee granules
1 tablespoon unsweetened cocoa powder
1 tablespoon white sugar
1 cup bread flour
1 cup whole wheat flour
1 1/4 teaspoons bread machine yeast

Place the warm water, butter, honey, salt, coffee, cocoa, sugar, bread flour, whole wheat flour, and bread machine yeast in the pan of a bread machine in the order listed. Put on regular or basic cycle with light crust.

Thursday, December 31, 2009

Old-Fashioned Wheat Bread

Here is another recipe that I tried from the 250 Best American Bread Machine Baking Recipes book that I have checked out from the library. I made this a couple of weeks ago and it is very good - I've actually made it once more since. It is moist, yet sort of dense, with a nice crumb. Its great for sandwiches and toast in the mornings! I have a picture of the bread sliced - but that picture is still on the camera, so I'll update with that later on.

Old-Fashioned Wheat Bread

1 1/2 cups water
1/4 cup nonfat dry milk
1 1/2 teaspoon salt
2 Tablespoons liquid honey
1 Tablespoon molasses
2 Tablespoons vegetable oil
2 1/2 cups whole wheat flour
1 cup bread flour
1/4 cup gluten
1 1/4 teaspoon bread machine yeast

Measure ingredients into baking pan in the order recommended by your machine manufacturer. Insert pan in the oven chamber. Select Whole Wheat Cycle. Makes a 1.5 pound loaf.

* For a sweeter, milder-flavored bread, you may substitute packed brown sugar for the honey and molasses.

* You may use the Rapid Whole Wheat Cycle, just increase the yeast by 1/2 teaspoon.

Saturday, October 10, 2009

Pumpkin Pie Muffins

Carson and I made some pumpkin pie muffins this morning. The recipe comes from my Ellie Krieger: The Food You Crave cookbook. I've made these before and had frozen most of them for breakfasts on the run and snacks, but realized I never posted the recipe. These are very tasty muffins - they do taste a lot like pumpkin pie, so if you like pumpkin pie, you'll love these! We made mini-muffins this morning and got 48 of them from this recipe. Plenty for us to share and still have lots to freeze! We're taking some over to my SIL's house tonight when we take them dinner. I made regular sized muffins last time and I think I got 20 from this recipe. My muffin tins must be smaller than Ellie's regular muffin tins since the recipe says you only get 12 muffins.

Pumpkin Pie Muffins

Cooking spray
1 cup all-purpose flour
1 cup whole-grain pastry flour
1 teaspoon baking soda
1/2 teaspoon salt
1 teaspoon ground cinnamon
1/2 teaspoon ground ginger
1/4 teaspoon ground cloves
1/8 teaspoon ground nutmeg
3/4 cup packed dark brown sugar
3 tablespoons unsulphered molasses
1/4 cup canola oil
2 large eggs
1 cup canned pumpkin
1 teaspoon vanilla extract
3/4 cup lowfat buttermilk
1/4 cup raw, unsalted pumpkin seeds (I left these off)

Preheat oven to 400 degrees F. Coat a 12-cup muffin pan with cooking spray.

In a medium bowl, whisk together the all-purpose and whole-wheat flours, baking soda, salt, cinnamon, ginger, cloves, and nutmeg.

In a large bowl, whisk the sugar, molasses, oil and 1 egg until combined. Add the other egg and whisk well. Whisk in the pumpkin and vanilla. Whisk in the flour mixture in 2 batches, alternating with the buttermilk. Whisk just until combined.

Pour the batter into the prepared muffin pan and sprinkle with the pumpkin seeds. Tap the pan on the counter a few times to remove any air bubbles. Bake for 20 minutes or until a wooden pick inserted in center of 1 of the muffins comes out clean.

Let cool on a wire rack for 15 minutes. Run a knife around the muffins to loosen them and unmold. Cool completely on the rack.

Sunday, August 9, 2009

Zucchini Yeast Rolls

This recipe comes from my Simply in Season cookbook. I've been wanting to make these for a few weeks now, but finally had some time for it last week. These are so very yummy! And healthier than a normal roll. You really can't taste the zucchini... its a nice way to sneak in just a few more veggies! :) I got 25 rolls out of this (just larger than golf balls when I rolled them). I kept some out for fresh eating with meals and have frozen the majority of them. I'll update later with a picture once I upload my pictures.

Zucchini Yeast Rolls

2-3 cups shredded zucchini or summer squash
1 cup water
1/2 cup sugar
3 Tablespoons oil
2 teaspoons salt
1 cup bread flour
1 cup whole wheat flour
1/3 cup dry milk powder (left this out b/c mine was old and I threw it away)
2 Tablespoons active dry yeast
1/2 teaspoon ground mace (optional... I left it out)
1 3/4-2 1/2 cups bread flour

Combine the zucchini/squash, water, sugar, oil, and salt in a saucepan and heat slowly until warm, stirring to blend. Or warm in the microwave.

Combine 1 cup bread flour, whole wheat flour, milk powder, yeast, and mace if using in a mixing bowl. Add liquid ingredients and beat well until smooth. (I used my KitchenAid mixer). Stir in enough additional bread flour to make a soft dough. Knead 8-10 minutes until smooth and elastic. Place in greased bowl, turn to grease both sides. Cover with a damp towel and let rise for 10 minutes. Shape into rolls and place on a greased baking sheet. Cover and let rise until doubled. Bake in preheated oven at 350 degrees until golden brown, 25-35 minutes. Brush with milk for a soft crust and let stand 5-10 minutes before removing to a wire rack.

Sunday, February 22, 2009

Fast, Creamy Chicken Stew with Parsleyed Dumplings

For dinner last night, we had a fast, creamy chicken stew with parsleyed dumplings. I got the recipe from my New Whole Grains Cookbook. I had planned to do this on Friday, but we ended up going out to eat at Buffalo Wild Wings for Kevin's birthday on Friday night instead, so I made it last night. This was so easy and GOOD! I loved it! Kevin loved the stew part, but wasn't crazy about the dumplings. He'd never had any soups with dumplings before, and decided he doesn't like them. I thought they were awesome! Definitely something I'll make again - just probably with less or no dumplings for Kevin. The EVOO, onion, carrot, stock, spices, flour, egg, and yogurt were organic.

Fast Creamy Chicken Stew with Parsleyed Dumplings

For the soup:
3 teaspoons EVOO
1/2 large onion, chopped
2 stalks celery, chopped
1 large carrot, chopped
8 ounces boneless, skinless chicken thighs, cut into chunks
2 cups chicken stock
1/2 teaspoon dried thyme
1/2 teaspoon dried marjarom
1/4 cup heavy cream
1/2 cup frozen peas or edamame
1/2 teaspoon salt
1/2 teaspoon pepper

For the dumplings:
1 cup whole wheat pastry flour
1 cup minced fresh parsley (I just used dried)
1/2 teaspoon baking powder
1/2 teaspoon baking soda
1/2 teaspoon salt
1 large egg
6 Tablespoons yogurt or buttermilk, plus more if needed

In a large soup pot or dutch oven, heat 2 teaspoons of the oil and saute the onion, celery, and carrot over medium heat until softened. Scrape them to the side and add the chicken. Sear the chicken chunks, undisturbed, over medium-high heat for a minute, then stir. When the chicken is browned all over, add the stock, thyme, marjoram, and cream. Bring to a boil, then reduce heat to simmer until desired thickness. Add the peas, salt, and pepper. Keep simmering over low heat.

For the dumplings, mix all ingredients and quickly mix. It should be a soft dough, not a stiff dough. Add more yogurt if stiff. Drop the dough by heaping tablespoons full into the simmering stew. Turn the heat up to medium-high, cover and cook for 5-7 minutes. Uncover, cut one of the dumplings in half. If it is still doughy, replace the cover and cook for an additional 2-3 minutes until done.

Serve immediately.